Self Deployments
“I ran all of the bot commands you told me to and it gave me some files. Now what?”
Prerequisites
To host your bot you will need:
- A Discord developer account.
- A Github account. You won’t need to do any actual coding for this.
- A Heroku account. You can do this using only free resources but you will need to enter a credit card.
If you don’t want to use Heroku you can also try Deploying Locally.
Deployment Steps
Discord
- Create a new application and add a bot to it.
- Change its icon to the avatar you received in a private message from running
df!deploy self. - Copy the bot’s token (not the application’s client secret) and keep it somewhere safe.
Also, make sure you download the files from Discord. You may edit the parameters in *-config.json but do not rename either file.

Tip
Plexi Development users will need to do the following: 1) Change bot_prefix to something unique 2) Add the Plexi test server to white_list_server_ids 3) Change reply_probability to 0.
Github
Head over here and create a fork. Don’t write any new code or push any changes unless you feel like doing so.
Heroku
Create a new app in Heroku . You can host several bots in a single app. With free resources I was able to run three of them. And if you want more bots you always can create more apps.

Under the Deploy tab link the app to your Github repository.

Under Automatic Deploys select the self-deployment branch and enable automatic deploys.

Run a manual deploy while you’re here.

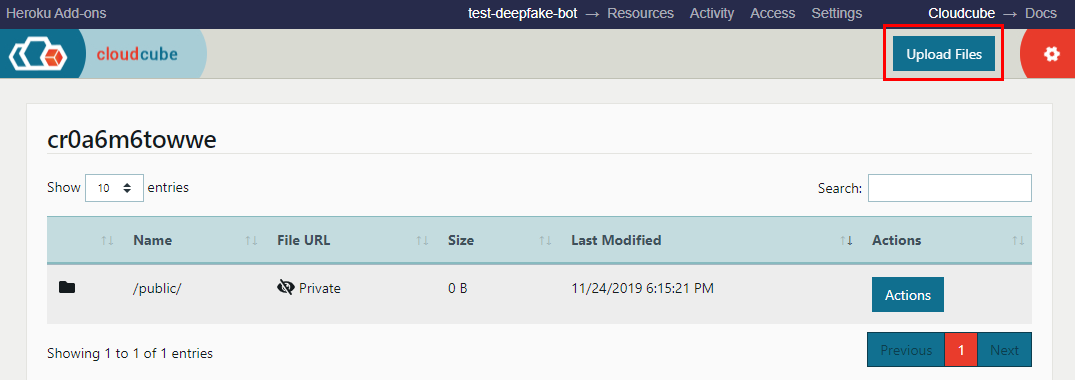
Under the Resources tab search for “Cloudcube” in Add-ons. Provision a free plan. Then open the link in a new tab.

Click Upload Files in the upper right hand corner of your Cloudcube page. You should upload both the *-config.json and
*-markov-model-encrypted.json.gz files and keep them private.
Go back to your Heroku app under the Resources tab and click Reveal Config Vars. You should see some variables from Cloudcube. Don’t touch these.
But do add the following environment variables:
DEEPFAKE_MODEL_UID_1- this will be the file prefix for your model artifactsDEEPFAKE_SECRET_KEY_1- this will be the secret key that you should have received in a private message from DeepfakeBotDEEPFAKE_BOT_TOKEN_1- this will be the bot token you copied earlier
To run multiple bots, add more model artifacts to your Cloudcube folder and create DEEPFAKE_MODEL_UID_2, DEEPFAKE_SECRET_KEY_2,
DEEPFAKE_BOT_TOKEN_2 and so forth.
You can add up to 10 such environment variable trios by default. You’ll quickly run out of Cloudcube space and dyno memory on a free plan however.
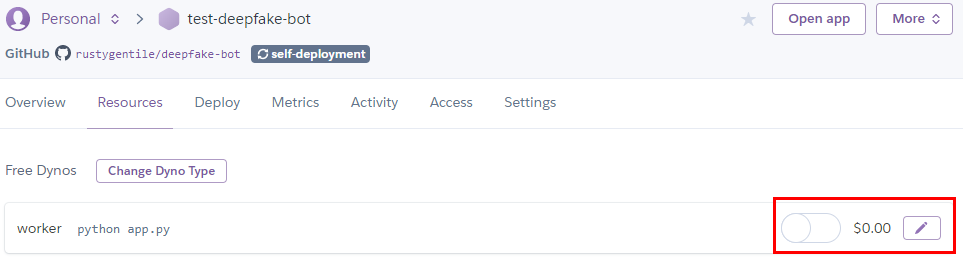
Proceed to the Resources tab and enable a free worker dyno. Your bot should start running now.
To verify everything is working, go to the upper right corner and click More –> View logs.
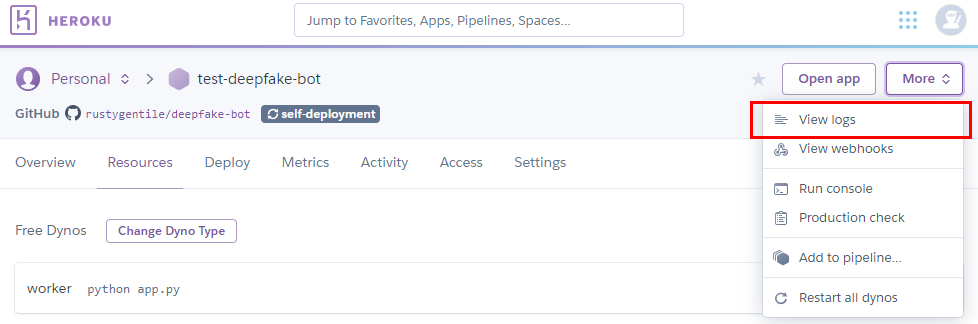
You should see something like this eventually:
2019-11-24T21:24:19.779681+00:00 app[worker.1]: INFO:cogs.config_cog:Logged in as
2019-11-24T21:24:19.779766+00:00 app[worker.1]: INFO:cogs.config_cog:<name>
2019-11-24T21:24:19.779863+00:00 app[worker.1]: INFO:cogs.config_cog:<id>
That’s it! Your bot is up and running. Now go add it to your Discord server.
Deploying Locally
If you’d like to run your bot without using Heroku or having to enter your credit card information, you can do the following:
- Clone or download the
self-deploymentbranch of your repository. - Install a python distribution. I recommend this one.
- Create and activate an environment for your bot application. Then install the needed python packages with:
pip install -r requirements.txt - Add your model artifacts (.gz and .json files) to the
./deepfake-bot/tmpfolder (instead of Cloudcube). - Create another file in
./deepfake-bot/tmpcalledsecrets.json(instead of using environment variables). - Add
DEEPFAKE_MODEL_UID_1… and so forth to it. When you’re done, it should look similar to this:

- Start your bot(s) with:
python app.py --local
Enjoy!